Friday, August 25, 2017

Just Add Ink #374 | Just Add Inspiration

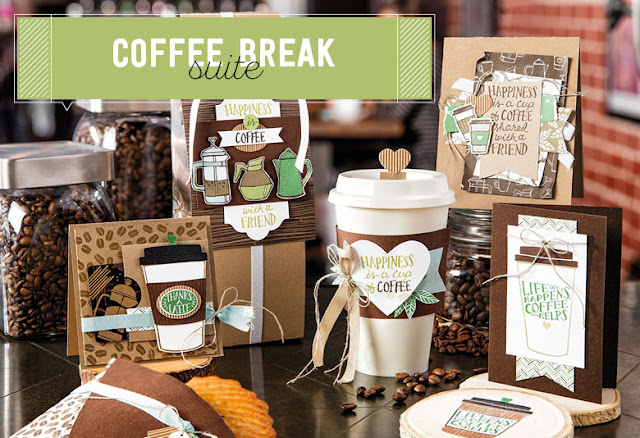
Hello to you. Welcome to you and welcome to another Just Add Ink Challenge. We have an ispiration picture for you. It's dark, its broody, it's rustic, it's textural and it also involves one of my favourite beverages - COFFEE!!!


I thought that the colours and the elements were perfect for a Father's Day card. Father's Day here in Australia is the first Sunday in September and this challenge has come just in time for me to make a card for my kids to give to their dad. What dad doesn't love coffee?


While my card today is quite basic in it's approach to the challenge I'm loving the dramatic look with the Basic Black cardstock, the constrasting Whisper White Cardstock and then the dark, rustic Wood Textures DSP.  Perfect for a Father's Day inspired card.


 To add an extra element I used the Basic Black Stampin' Write Marker to splatter some ink around the Whisper White cardstock boarder. This also makes the Whisper White layer look less stark , adding to the dramatic look.


How fabulous is the new 7/8" Striped Ribbon from the up coming Stampin' Up! Holiday Catalogue???? I'm a sucker for anything Black and White and I'm loving it teamed up with the Burlap Ribbon and the Wood Textures DSP. Gorgeous!!! Not only is it great for your Christmas/Holiday Creations but it is fabulous for everything else too! I think I'm going to be using a lot of this gorgeous ribbon. Put it on your wish list so that you can order it come September 1st.

Make sure you check out the rest of the AMAZING creations from the rest of the Just Add Ink Design Team. So many fabulous creations from one Inspiration Picture. While you are visiting the JAI blog check out all the details on how you can enter this weeks challenge. I'm so looking forward to seeing your take on this weeks inspiration picture.

Thanks so much for stopping by!
Live in Australia?
 Shop for Stampin' Up! with me 24/7

 Recreate this card at home using the following Stampin' Up! products. Click on the images below to see the product information and to shop from my online store.

Friday, August 18, 2017

Stampin' Up! Artisan Blog Hop | RMHC Stamp Set | Sharing Sweet Thoughts

Hello and welcome to this weeks Stampin' Up! Artisan Design Team Blog Hop. We have a fun and very special hop for you with the Sharing Sweet Thoughts Stamp Set as our focus. It's super cute and super fun and it also co-ordinates with the Everyday Jars Framelits Dies set to die cut the jar and the lids.

http://www3.stampinup.com/ECWeb/ProductDetails.aspx?dbwsdemoid=4009179&productID=144051
Click on the picture to find this set in my online store

This is this years Ronald McDonald Stamp Set and it is fabulous!! Did you know that for everyone one of the Sharing Sweet Thoughts Stamp Set that sells Stampin' Up! Donates $3 to the Ronald McDonald House Charity?!! You not only get a fabulous stamp set when you purchase this set but you are also contributing to a very worthwhile cause that helps so many people in a time of great need. To date Stampin' Up! have contributed over $1,000,000 to RHMC and their network of local RMHC Chapters. What an amazing effort!!To learn more about this wonderful organisation click here.


I've really only used the strawberry image, the jar and one of the lids from this set but I've gone for maximum impact with these images. I've used the masking technique to stamp the strawberries all over the card background.

 To create a mask I first stamped the strawberry image on a post-it note making sure part of the image has the sticky backing strip on it. And then I fussy cut the image to make this my reusable mask.


Once I stamped and then clear embossed the first strawberry image, I placed the post-it-note mask over my first stamped image and then stamped over that to get the next image. You then keep moving the mask over the next stamped image and then repeating the process until you have the coverage of stamping that you want.


Once all the strawberries were stamped and then clear embossed next was to colour them all in. Using an aqua painter and some ink squeezed out of the ink pad sitting in the lid, I coloured them all in. Because I used Crumb Cake as my card base, I really made sure that my aqua painted was just damp and not to much water was coming out of the aqua painter. If its too wet when colouring on Crumb Cake the cardstock will pill and ball up, leaving a not so pleasant looking card. 


I really love all the strawberries together like that. Almost looks like jam. The gorgeous Real Red colour with the little pops of Garden Green. Super fun.

Because the card background is very busy, I really kept the rest of the card quite simple. Just a little bit more of the strawberries in a jar and the cute little sentiment from the Sharing Sweet Thoughts Stamp Set. Also simply embellished with Linen Thread, Gold Mini Sequin Trim and Gold Faceted Gems.

While the whole process of masking, stamping, clear embossing and then colouring was quite a process I really love those gorgeous colours for a fun background.

Now on to Shannon Lane over in Canada. I'm sure she will have something fun, colourful and funky made with this set. She has an amazing way of turning everything into a fabulous and modern work of art.

http://crushoncolour.blogspot.com.au/2017/08/artisan-aug-2.html


Thanks so much for stopping by!

Live in Australia?
 Shop for Stampin' Up! with me 24/7

 Recreate this card at home using the following Stampin' Up! products. Click on the images below to see the product information and to shop from my online store.

Friday, August 11, 2017

Just Add Ink #372 | Just Add A Colour Combo

Happy Friday!! I hope you're ready for the weekend! A chance to maybe get some things done around the house, spend some time with the family or even some time to do some crafting.

If you have a moment over the weekend, why not join in this weeks challenge over at Just Add Ink. We have a beautiful colour challenge for you. So gorgeous and so pretty.


 Click on the colour name to see all the Stampin' Up! products in that colour

My card today is quite crisp and fresh with touches of the challenge colours. I've used one of the images from the Eastern Beauty stamp set and then accented the card with some of the gorgeous Stampin' Up! ribbons, trims and embellishments.


I really wanted to keep the card clean and uncluttered so I stamped and the heat embossed the image from the Eastern Beauty stamp set using Versamark and White Stampin' Emboss powder. I then used the Powder Pink Classic ink and an Aqua Painter to add some colour to the stamped image. I just kept adding the colour till I achieved the colour that I wanted. The Powder Pink is a beautiful and light pink colour and I love the 'blush' hue that it gives when added to a card with an aqua painter. So pretty, so soft, so gorgeous!


I've layered under the top panel Powder Pink and Tranquil Tide card stock for a little bit of added colour.


Then to finish the card off I added some Pool Party Shimmery Ribbon, Eastern Gold Vinyl Stickers, Mini Tassels, Gold Metallic Thread, Gold 1/8" Ribbon, Tranquil Tide Finely Woven Ribbon and Pool Party Sequins from the the Iridescent Sequin Assortment. Lots of gorgeous embellishments! Love it!

Make sure you head on over to the Just Add Ink Blog for all the Design Team Creations. There are so many fabulous creations from this fabulous Design Team. So many ideas. You'll love them. While you are over there check out all the details on this weeks challenge and enter in you creation. Can't wait to see what you come up with.

Thanks so much for stopping by!
Live in Australia?
 Shop for Stampin' Up! with me 24/7

Recreate this card at home using the following Stampin' Up! products. Click on the images below to see the product information and to shop from my online store.

Thursday, August 10, 2017

Stamp to Share International Design Team Blog Hop | Coffee Cafe Bundle

Why hello there!! It's time for another Stamp to Share Blog Hop. We are a group of Stampin' Up! demonstrators from each Stampin' Up! market around the world, sharing what we love, Stampin' Up! of course.


This hop we are showing the super fun Coffee Cafe Bundle from the Coffee Break Suite in the 2017 - 2018 Annual Catalogue. Love it!

http://www3.stampinup.com/ECWeb/ItemList.aspx?dbwsdemoid=4009899&categoryid=301002

I've made two cards today using the sentiment from the Coffee Cafe stamp set and then embellished the cards using the Coffee Cups Framelits Dies and the Coffee Break DSP.


My first card I've die cut a few of the really small coffee cups from the Framelit set and adhered them to the Crumb Cake layer. This  technique is called Faux Embossing and it makes it look like the cardstock has been run through and embossing folder with the Big Shot. Super easy to do and so effective.

Underneath the faux embossed layer is a piece of the Coffee Break DSP. How cute are those little hearts? I don't realise this gorgeous pattern was in the DSP until I opened it. Just love it. Will be making more creations with that pattern, that's for sure!


Over top of the faux embossing look I flicked the Early Espresso Stampin' Write Marker for a fun splatter look. Just use the brush tip end and the lid of the marker to flick the splatters.

I've then finished the card off with some Garden Green Stitched Satin Ribbon, Linen Thread, Gold Sequins and the cute little coffee cup die cut from a sheet of the Coffee Break DSP. Did you know that the little coffee cup from the Coffee Cafe Framelits Dies die cuts the little coffee cups from the Coffee Break DSP? Love that. Makes the products so much more versatile and No fussy cutting! Boo yeah!!


The second card I wanted to use that big sentiment as a focus point on the card and then do a bit of a a watercolour wash over it. I first stamped the sentiment in Versamark Ink and then embossed it with Gold Stampin' Emboss powder. Once the embossing was set then I washed over it with Soft Sky Ink for an emboss resist look.

Once the water colour wash was dry I then used the aqua painter to flick drops of water over the ink and then once the water droplets we dry I used the Soft Sky Stampin' Write Marker for some ink splatters. Lots of processes but I think the layers of ink and water give a fabulous look. Because the Soft Sky ink is really light it is quite hard to photograph but it looks fabulous in real life.


I've layered my watercolour piece on a layer of the Coffee Break DSP. This pattern on the DSP has splatters all over it too so it ties in quite well with my card. It could have been used with either card.

Then in the top left corner I've embellished it with Soft Sky Classic Weave Ribbon, Gold Mini Sequin Trim, Linen Thread and the heart from the Corrugated Elements embellishments. As I was adhering the heart to the ribbon I pushed down quite hard to make sure that it was stuck down and pushed in some of the corrugations. Oops.


Over the corrugated heart and the little coffee cup I brushed over Clear Wink of Stella for some more gorgeousness but its so hard to photograph. If anyone has any great tips on photographing Clear Wink of Stella, I'd love to hear them. It's just too pretty not to show you.


Now on to the amazing Sandi MacIver over in Canada. She is going to knock your socks off with her creations! Just amazing!!!!

http://wp.me/p6OinC-2zs

If you do get lost along the hop, here is a list of the Design Team members - Just click on their name to get you going again.
 
Moira Mcilroy - France

Thanks so much for stopping by!
Live in Australia?
 Shop for Stampin' Up! with me 24/7
Recreate these cards at home using the following Stamin' Up! products. Click on the images below to see the product information and to shop from my online store.
 

Monday, August 7, 2017

Stamp Review Crew | This Little Piggy

Hello and Welcome. Yep! It's Stamp Review Crew time. We are hopping with a super fun and super cute set. This Little Piggy. So fun!

If you are joining us for the first time we are a group of International Stampin' Up! demonstrators that show one Stampin' Up! stamp set at a time, every first and third Monday's of the month. Be sure to make your way around the hop by clicking the next button at the bottom of each post. If you get lost along the way click on the banner at the top of each post and that will lead you to the list of hoppers so you can continue seeing all the fabulous creations.

http://stampreviewcrew.blogspot.com/2017/08/this-little-piggy.html

http://www3.stampinup.com/ECWeb/ProductDetails.aspx?dbwsdemoid=4009899&productID=143922

Now on to the fun part, the cards! I had to use some pink for today's card. Pigs are pink right? So I've gone with using one of the new 2017-2019 In Colours, Powder Pink. So pretty and so pink. Perfect to go with the This Little Piggy Stamp Set.

My card is pretty straight forward today. Little bit of colouring, little it of stamping and few embellishments. Sometimes that's all you need for a fun card.


I started with the stamping of the pig. I first stamped it in Versamark Ink and then inked it up with Memento Black ink so that I could emboss the image with Clear Stampin' Emboss Powder. I find that when I'm colouring an image I like to Clear Emboss the outline. You don't have to be so careful when colouring if the outline is embossed and the ink doesn't bleed outside the lines when water colouring.

I just started with a light wash of colour when colouring the image and then gradually added more colour to the areas that I wanted to be darker. To colour the pig I just squeezed the Powder Pink Ink Pad so that there was some colour in the top of the lid and then picked up the colour off that using and aqua painter. Love that the ink pads are designed like that. Less mess.


Once the cute little piggy was coloured I fussy cut it out and then added all the other elements to the card. 

The 'This Little Piggy' words were part of the pig image so to stamp the words with out the pig I masked off the image above the words with Washi Tape, inked up the words, removed the tape and then I could stamp the words down without the outline of the pig as well. 

On the inside you could then stamp any one of the other sentiments like 'Loves You' or 'Says Thanks' to finish off the card.

Now on to the fabulous Ann Schach for some more cuteness and fun.

https://stampinchic.com/2017/08/stamp-review-crew-piggy/
Ann Schach

https://iguanastamp.wordpress.com/2017/08/06/stamp-review-crew-this-little-piggy/
Nancy Smith

Thanks so much for stopping by!

Live in Australia?
 Shop for Stampin' Up! with me 24/7
 Recreate this card at home using the following Stamin' Up! products. Click on the images below to see the product information and to shop from my online store.

Friday, August 4, 2017

Stampin' Up! Artisan Blog Hop | More Carols of Christmas

Hello, hello, hello! It's Stampin' Up! Artisan Design Team Blog Hop day and we are hopping with the Carols of Christmas stamp set and Card Front Builder Thinlits Dies. Lots of fun and lots of more fabulous ideas. And hopefully some inspiration for you.
http://www3.stampinup.com/ECWeb/ItemList.aspx?dbwsdemoid=4009899&categoryid=300090
I can't believe we are starting our Christmas creations. Although now is a perfect time to get that head start while things aren't crazy busy. So why not get this Carols of Christmas Stamp set and the co-ordinating thinlits now for that head start on those Christmas cards. Get these two products together in a bundle and you will save yourself 10%.  Not only will are these products so fabulous they are so versatile with so many different looks you can created. I'm sure the rest of the Artisans have shown you how amazing these products are.

I've got three cards for you today. One layout with three different looks trying to use a lot of the elements from the stamp set and the thinlits dies .


The first card starts with some Very Vanilla Cardstock and the Sheet Music Background Stamp, stamped with Crumb Cake Classic Ink for a fun background. The 'Peace on Earth' was stamped with Basic Black ink and then heat embossed with Clear Stampin' Emboss Powder. I love using Clear Stampin' Emboss Powder over different coloured inks. I just gives some thing extra and special to any card. I then added a scalloped square frame cut using the Layering Squares Framelits. Super gorgeous in the Gold Glimmer Paper to add to that festive feel.


The next card uses some a black, gold and white colour combo. Such a classic look. Don't you just love those bold gold and white stripes. They don't come from any DSP pack but from one of the new Striped Treat Bags from the 2017 - 2018 Annual Catalogue. I love, love, love big, bold stripes like this, *sniff, sniff*, Pop of Pink, I miss you! So when I saw the stripes of the treat bag I knew I had to cut it up and use it as DSP. If you are going to use it be careful with it especially when cutting with thinlits and Framelits as the paper of the treat bag is a lot thinner than the usual DSP and will have a tendency to tear.

How fabulous does that thinlit look die cut into the treat bag? I love the Basic Black cardstock behind it to keep in with that classic look.


Last, but not least, is using the Poinsettia Thinlits Dies. Again I started with the Basic Black base and then layered with Shimmery White and Cherry Cobbler. How fabulous is Cherry Cobbler for Christmas cards and crafts? It really is the Stampin' Up! Christmas Red. It's perfect for Christmas!

Because the Poinsettia thinlits made the card quite busy I thought it really didn't need much else. I added a small piece of the Fabulous Foil Acetate, little bit of  the Burlap Ribbon and some of the Gild Mini Sequin Trim.


What's the saying, 'Same, same but different".  I hope that I've given you some more inspiration especially to get a head start on your Christmas Cards and get the ball rolling.
So get this bundle now and save yourself 10%.


Just ask me today how you can get your hands on this fabulous bundle. You wont be disappointed! For some more ideas using this set check out my other ideas HERE and HERE.

Now on to the amazingly talented and amazingly creative Shannon Lane in Canada. I'm sure she will WOW you as she always WOW's me!

http://crushoncolour.blogspot.com.au/2017/08/artisan-aug-1.html

http://www3.stampinup.com/ECWeb/ItemList.aspx?dbwsdemoid=4009899&categoryid=300090

Thanks for stopping by!

Live in Australia?
 Shop for Stampin' Up! with me 24/7
 
 Recreate these creations at home using the following Stamin' Up! products. Click on the images below to see the product information and to shop from my online store.